Muvi Media Connect Wordpress Plugin - Rating, Reviews, Demo & Download

Plugin Description
Now add engaging audio and video content to your WordPress websites, with Muvi’s all-in-one WordPress plugin – Muvi Media Connect. It enables your authors to add videos and audio tracks to your WordPress posts in just a few clicks, directly from your Muvi One media library. You just need to add our plugin, choose the media you want to add and add it to a suitable place, that’s it! Muvi will take care of everything else.
Muvi Media Connect helps you in
- Auto-transcoding of uploaded videos.
- Adaptive streaming.
- Delivery via leading CDNs.
- Providing subscribers and guests a superior viewing experience anywhere, anytime, on any device.
It’s time to make your WordPress posts more interesting and engaging, with buffer-free and latency-free videos streaming directly from Muvi’s CDN.
Embed Videos In WordPress
Using the Muvi Media Connect WordPress plugin, you can very easily embed videos to your WordPress websites, and make them more interesting for your viewers. You just need to follow the steps given below
- Download the Muvi Media Connect WordPress plugin.
- Once downloaded, click on its icon appearing on the sidebar to enter the settings page.
- Put the authorization key of your MUVI account on that page.
- Adjust the size of the video frame and click on save.
The next time you will go to upload any media content on WordPress, you will see the option of the Muvi Media Connect Plugin. Use it to embed amazing videos in your posts! Read our embed videos in WordPress blog to know about this process in detail.
Features
- The embedded video content remains secured through Muvi’s multi-DRM protection.
- Dynamic Watermarking safeguards your content from piracy attempts.
- With Geo-Blocking you can decide which people from which part of the globe can access your content.
- You can even blacklist IP addresses, the html5 video player will no longer play your content on those IP addresses.
- You can analyze the number of views your content received, geographies where it is popular and the type of devices used to view it.
- You don’t need to juggle between two platforms anymore, because you can access all on-demand video and audio content directly on the WordPress platform, through Muvi Media Connect!
- Want to upload bulk contents? Don’t worry, you can multi-select the contents you want and upload it in a single click.
USING MUVI MEDIA CONNECT PLUGIN
Note: This Muvi Media button appears only if you have WordPress Classic Editor installed or using WordPress version less than 4.5.
Content player publishing allows the user to easily insert contents from their Muvi store onto their WordPress site.
- To post a content in a post or page, navigate to Posts/Pages –> Add New/Edit in the WordPress editor.
- You can insert video-on-demand content to your post or page from your Muvi Store by clicking on Muvi Media.
- You will see the different content categories in the Muvi Media Library. Click on a specific Content Category under the Muvi Media Library to insert content.
- Select content(s) from the list and click on Insert. The the shortcode of content will be inserted to your post or page editor.
- After publishing the post/page you can view respective content(s) inside the post/page.
In the post, when you click on the embedded video content, Muvi’s video player opens, and the video gets streamed effortlessly.
How to add and edit a shortcode for content?
You can edit the shortcode by yourself by following the below process.
- When we add Single/Multipart content(AOD/VOD) from Muvi media, it generates a shortcode automatically.
- For VOD/AOD Single Part Content: Shortcode: [muvimedia permalink=’cat’ height=’315′ width=’560′] where muvimedia is the name of the shortcode which will be constant.
Permalink is a mandatory parameter that we will get from Muvi CMS. You need to go to manage content > content library > edit any content > permalink.
The height is the content height which is visible in the video and audio player when the content is played. The height is by default 315, but you can edit it as per your requirement.
Similarly, width is the content width which is by default 650, but you can edit it as per your requirement.
Screenshots

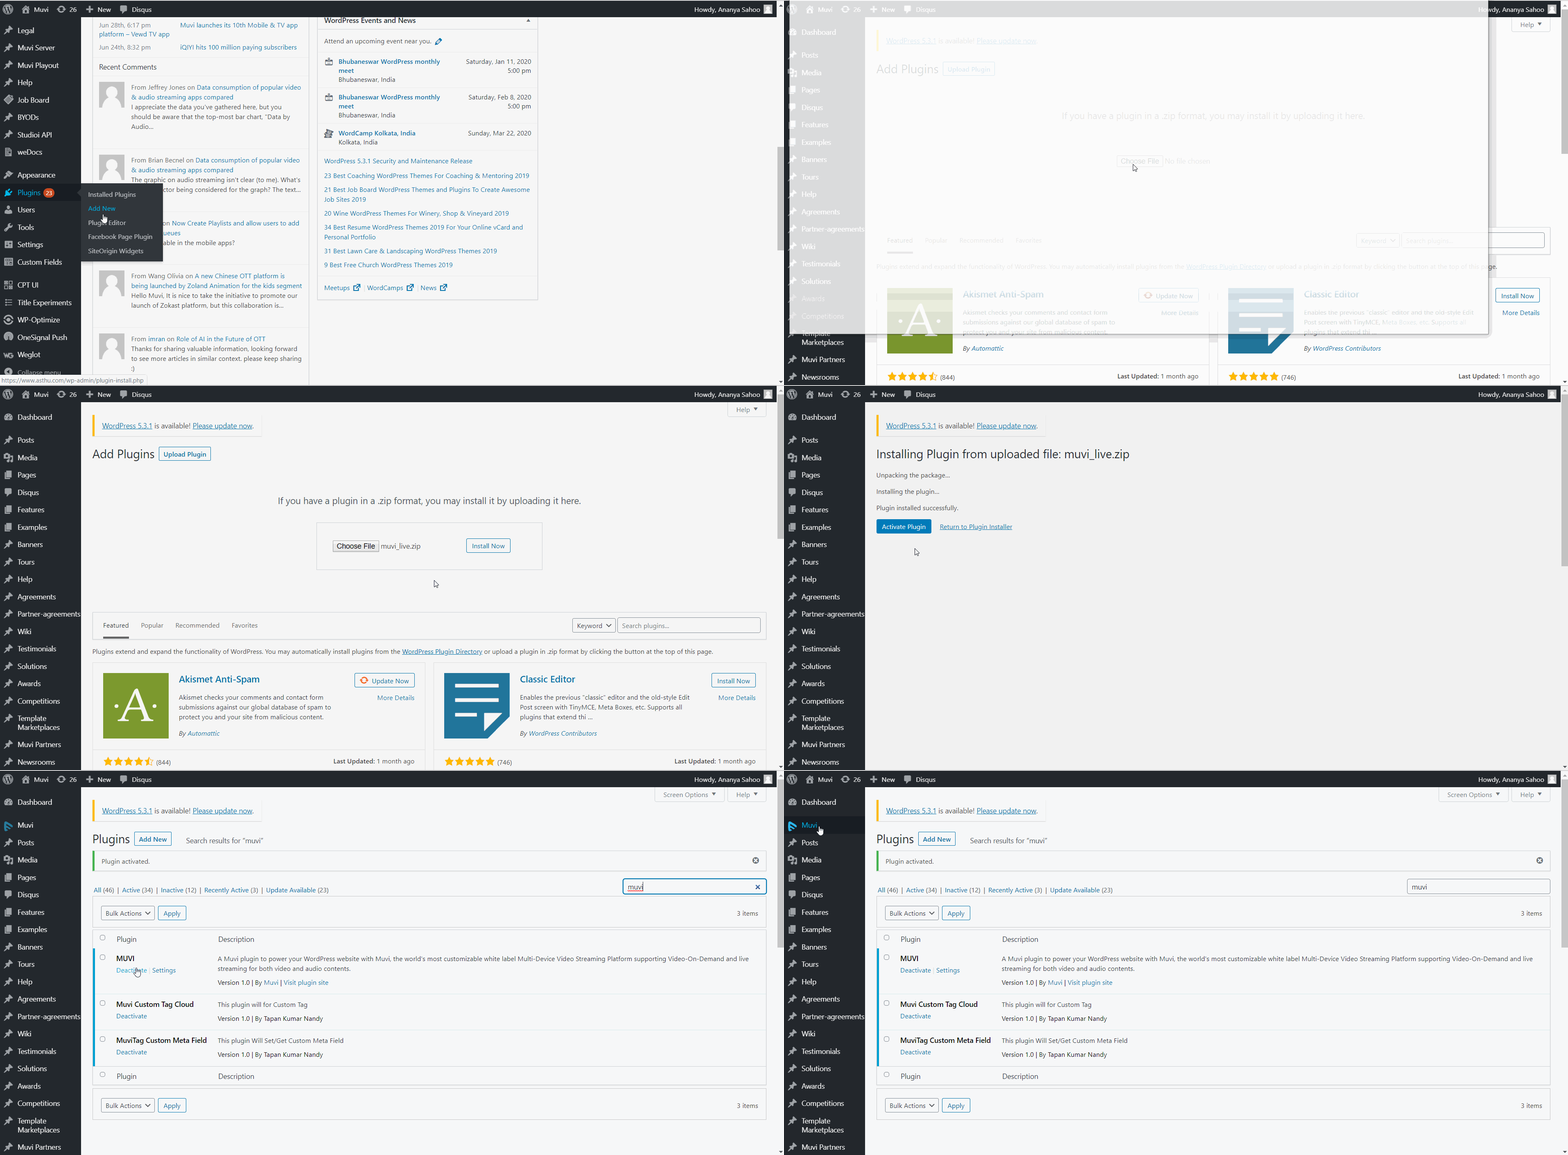
How to install the plugin

Configure the plugin, click on the installed Muvi Media Connect plugin (you can find it on the left-hand side of the menu)

The process of adding video/audio single/multipart content into any page or post.

How to install the latest version of plugin.

Activate the plugin.

Configure the plugin with required credentials like; If you are using MUVI 5 then only use Authorization Key and If you are using MUVI 6 then both Authorization Key & Authorization Secret Key are required.

Add block into Gutenberg editor with MUVI media connect plugin via search.

After adding block it gives you a interface to upload MUVI contents into your page/post.

Once you clicked on Upload MUVI media button, It’s open muvi stores contents into one popup with list of all contents which you have uploaded into your MUVI store.

Now you can select whatever content you want to add into your page/post. Remember here, You can only select Single part/Single content not Multiple/Multi part content into your page/post.

Once you select the single content and insert into page/post, it will automatically generates the short code to render it into your wordpress website.

Settings menu has a product selection dropdown for Muvi One & Muvi Flex.

Settings menu has a product selection dropdown for Muvi One Classic.

Once you clicked on Upload MUVI media button, It’s open muvi stores contents(type : Audio & Video) into one popup with list of all contents which you have uploaded into your MUVI store via clicking on Audio and Video tab wise.

Audio player support and how it will looks like into your web page.


