Follow for free plugins, new theme releases and theme news
Plugin Description
Supple Forms makes it easy to create a custom meta box or write panel to enter data while adding or editing posts and pages. Supple Forms allows you to easily format and insert your data into posts by using shortcodes and HTML snippets. Following are the features:
- Custom write panel or Meta box that displays on the Write Post form
- Fields utilizing textboxes, dropdown lists, radio buttons, checkboxes, textareas, and a jQuery DatePicker
- Allows fields with multiple values
- Options for placement of the custom meta box (after title, after the wysiwyg editor, at the bottom)
Choose between storing data in a Custom Table or as WordPress’ own Custom Fields….note that multiple value fields will be stored as WP Custom Fields
- Insert field values into posts/pages with a flexible shortcode api
- Create reuseable HTML (really HTML, Javascript or any valid XHTML) snippets – we call them snips in Supple Forms – that can utilize field values
- Easily insert snips into posts/pages with a shortcode
- Specify CSS code to be inserted with your HTML snips
- A database view is included to allow you to view your custom table data
Usage
Using Supple Forms is extremely simple:
- After uploading and activating the Supple Forms plugin (see the Installation page), you’re ready to begin building your form
- In the Supple Forms menu, click Form Settings to set form level defaults
- Enter a Form Title. This will be the title that shows in the form box on the Write Post/Page page
- Choose other form-level defaults such as whether to store data in a Custom Table or in WP Custom Fields
- In the Supple Forms menu, click Add/Edit Fields to add fields to your custom form.
- Add new fields or Edit existing ones by making the proper selection in the Select field dropdown box
- If you chose Custom Table as the storage option on the Form Settings page, a Generate Table button will be available on the Add/Edit Fields screen. You will a warning to Generate the table after a field is created or edited until you run the Generate Table option. However, do not Generate Table until you are done adding/editing your fields. It won’t break anything, but it is a best practice to wait. You can generate the table as often as you want, but waiting until you are done editing fields prevents creating extraneous fields in your database. Supple Forms will not Delete table fields or custom tables. We don’t want to risk you losing any data by stray clicks. So if you end up creating fields that later get changed, you will can delete them through phpMyAdmin or another database management tool.
- After you’ve added your fields and generated the Your fields will now be available on the Write Post/Page pages
- Saving a post/page or publishing a post/page saves your custom field data as well. Custom field data is not saved in the revisions. It is only linked to the actual Post ID record (not the revision IDs)
- To create HTML snips for inserting into posts/pages, in the Supple Forms menu, click the HTML Snips Editor
- In the HTML Snips Editor, you can create pre-formatted HTML snippets that include your data. Simply place your field names in brackets and insert them in your snips. For example: <div class=’neatbox’>I live in [city]</div>
- The name you give your HTML snip will be used in the shortcode that you insert into your posts/pages. For example, a snip named address_box would be inserted with this shortcode: [supple snip=’address_box’]
- Finally, place shortcodes like [supple snip=’my_snip’] in your posts or pages.
- For the programmer in you, you have direct access to your custom table from within your template code. Use the WordPress database object ($wpdb) to perform SQL commands and queries on your data. Your table name (if using Custom Table) is shown in red on the Form Settings page. Supple Forms utilizes your defined WordPress table prefix ($wpdb->prefix) + the prefix “supple_”. So a table that you named destinations would normally be in the database as: wp_supple_destinations (unless you changed your $wpdb->prefix to something other than the default (wp_))
Screenshots
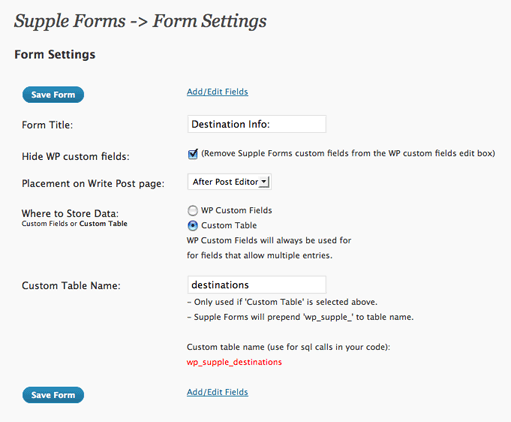
The Form Settings options page

Top portion of Add/Edit Fields page

Sample of a form within the Write Post page
