Pagalo – WooCommerce Payment Gateway Wordpress Plugin - Rating, Reviews, Demo & Download

Plugin Description
Pagalo – WooCommerce Payment Gateway
If the transaction is successful the order status will be changed to “processing”. If the payment charge failed the order status will be changed to “cancelled”. If something is wrong with the connection between your server and the Pagalo server the order status will be changed to “on-hold”. After successful transaction the customer is redirected to the default WP thank you page.
Support
Use the wordpress support forum for any questions regarding the plugin, or if you want to improve it.
Get Involved
Looking to contribute code to this plugin? Go ahead and fork the repository over at GitHub.
(submit pull requests to the latest “release-” tag).
Usage
To start using the “Pagalo – WooCommerce Payment Gateway”, first create an account at Pagalo.co. They will provide you with your account “IdenEmpresa”, “Token”, “Private key” and “Public Key”.
After you have your Pagalo or sandbox account active:
- Head to Woocommerce Settings and click on the Checkout tab.
- On checkout options you should see the option “Pagalo”, click on it.
- Enable the payment gateway byt checking the checkbox that reads “Enable this payment gateway”.
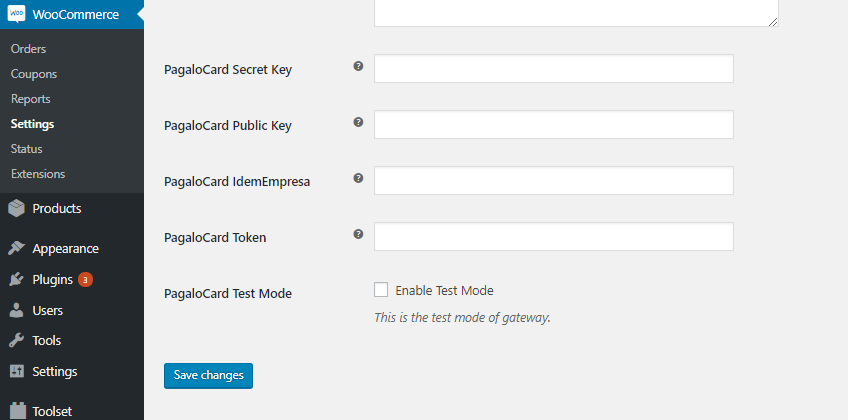
- Fill the form with your account information. Don’t forget to check the “Enable Test Mode” box if your account is from the sandbox.
- Click on save changes and you should be ready to start accepting credit cards with Pagalo.
Screenshots

The Pagalo payment gateway settings page showing the texts and description that can be customized.

The Pagalo payment gateway settings page showing the fields that need to be filled with each individual account information.

The checkout page with the pagalo payment credit card form.


