Wordpress Mailchimp Subscription Plugin - Rating, Reviews, Demo & Download
Plugin Description
Plugin Banner
Plugin installation
There are 2 ways to install a WordPress plugin:
- using the WordPress installer
- uploading the plugin via FTP
1. Using the WordPress installer
- Go to Plugins > Add new
- Click Upload
- Select the mailchimp-wordpress-plugin.zip file
- Click Install now
- Once the plugin has been installed click Activate Plugin
2. Uploading the plugin via FTP
- Upload the mailchimp-wordpress-plugin folder into the wp-content/plugins/ folder on your server
- Once the plugin is uploaded log into WordPress and go to Plugins
- Find the WP Mailchimp Subscription Pro plugin and click Activate Plugin
Plugin updates
In order to add new functionalities, to stay up to date with the
WordPress software evolution, to correct bugs, WP Mailchimp Subscription Pro plugin is regularly
updated.
Updating does not affect the content of your site. All the settings and data associated with the plugin will stay the same.
There are 2 ways to update the plugin:
- Automatic update
- FTP update
Whatever method you should backup your website.
It is not compulsory but periodically backing up your entire
installation (entire directory structure + database) is a good idea,
especially before making any type of update to themes, plugins, core
files, etc.
Learn more about backups here.
Automatic update
If you entered your admin->plugins page you will get WP Mailchimp Subscription Pro in the plugin list.
you will get notifications of new plugin releases directly on the plugin page and
you will be able to update in one click. thanks to the Update now action.

FTP update
-
Go on the downloads page of CodeCanyon and download the plugin again
(when you download the plugin you always get the latest version available) -
Unzip the plugin (you need to get an unzipped mailchimp-wordpress-plugin folder
that can be uploaded on your server later on) - Go on the plugin page and deactivate WP Mailchimp Subscription Pro plugin
-
On your server delete the mailchimp-wordpress-plugin folder which is located in
wp-content/plugins (note that this will not delete the WP Mailchimp Subscription Pro settings
since they are stored in your WordPress installation). - Upload the mailchimp-wordpress-plugin folder you have just unzipped into the wp-content/plugins/ folder
- Go on the plugin page and activate WP Mailchimp Subscription Pro plugin
Mailchimp Settings
In this section of the documentation, you will find information regarding the Mailchimp Settings menu.
For the plugin to work correctly you need to give mailchimp settings.
Below is the Mailchimp page

Here you need to give Api key of your mailchimp account and List ID under which you want to subscribe people. Then you need to choose Opt-in option of mailchimp.
Single Opt-in means subscription will be directly in one step. and double Opt-in means Subscription will be done in 2 steps. when a user send subscription request the a mail will be sent to users email with a varifaction link. when user clicks that link then findal subscription will be done.
Mailchimp Popup Core Settings
In this section of the documentation, you will find information regarding the Popup Core Settings menu.
Below is the Mailchimp Popup Core Setting page
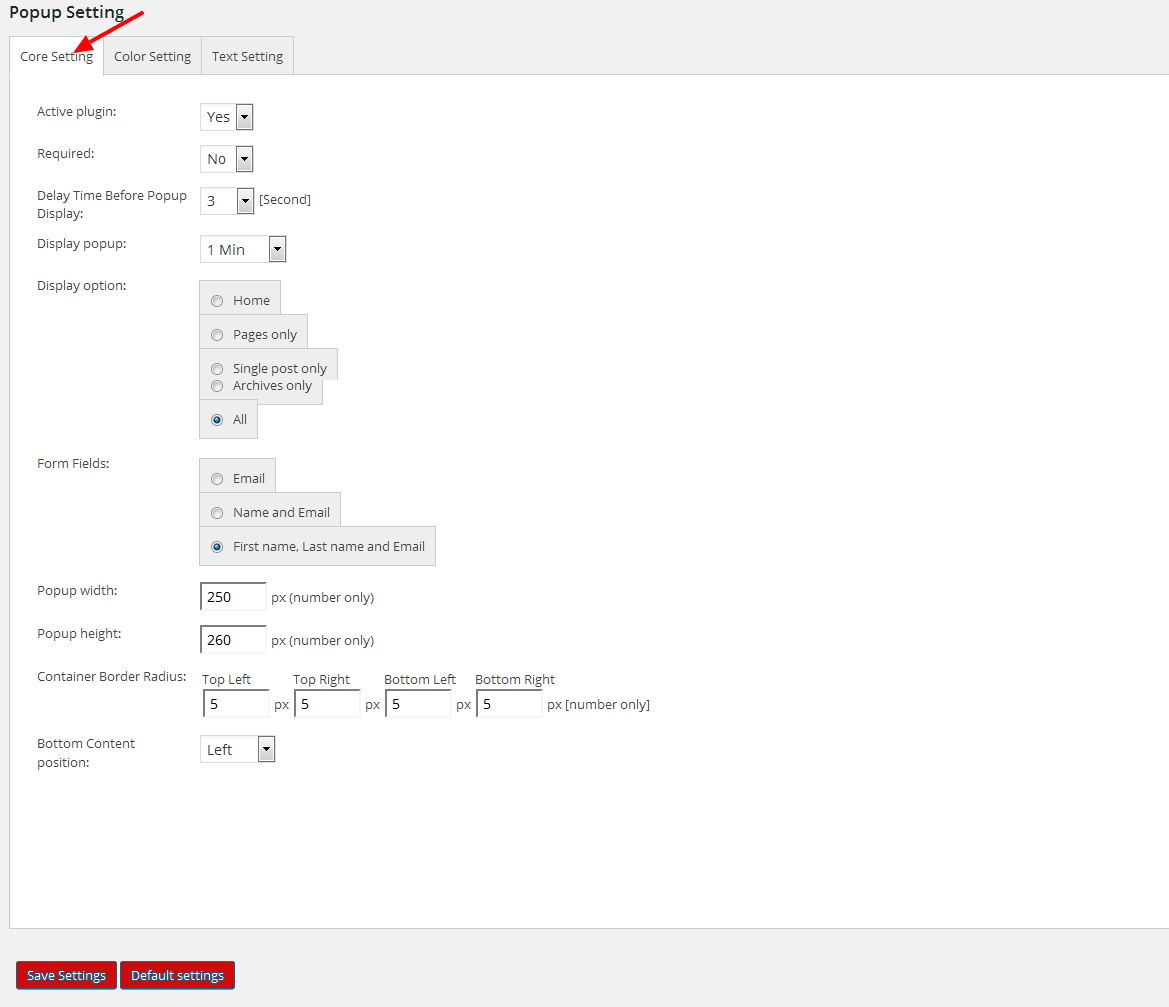
In core setting you can do below things:
- You can set plugin Active/In-active and Required Yes or no here.
- you can choose delay time before display popup,
- Display popup duration
- where to show popup, home/all site/only pages etc…
- 3 type of form fields you can choose
- you can set popup width and height
- border radious of the popup box
- and content postion.
Custom Popup Color Settings
In this section of the documentation, you will find information regarding the Custom Popup Color Settings menu.
Below is the Custom Popup color Setting page
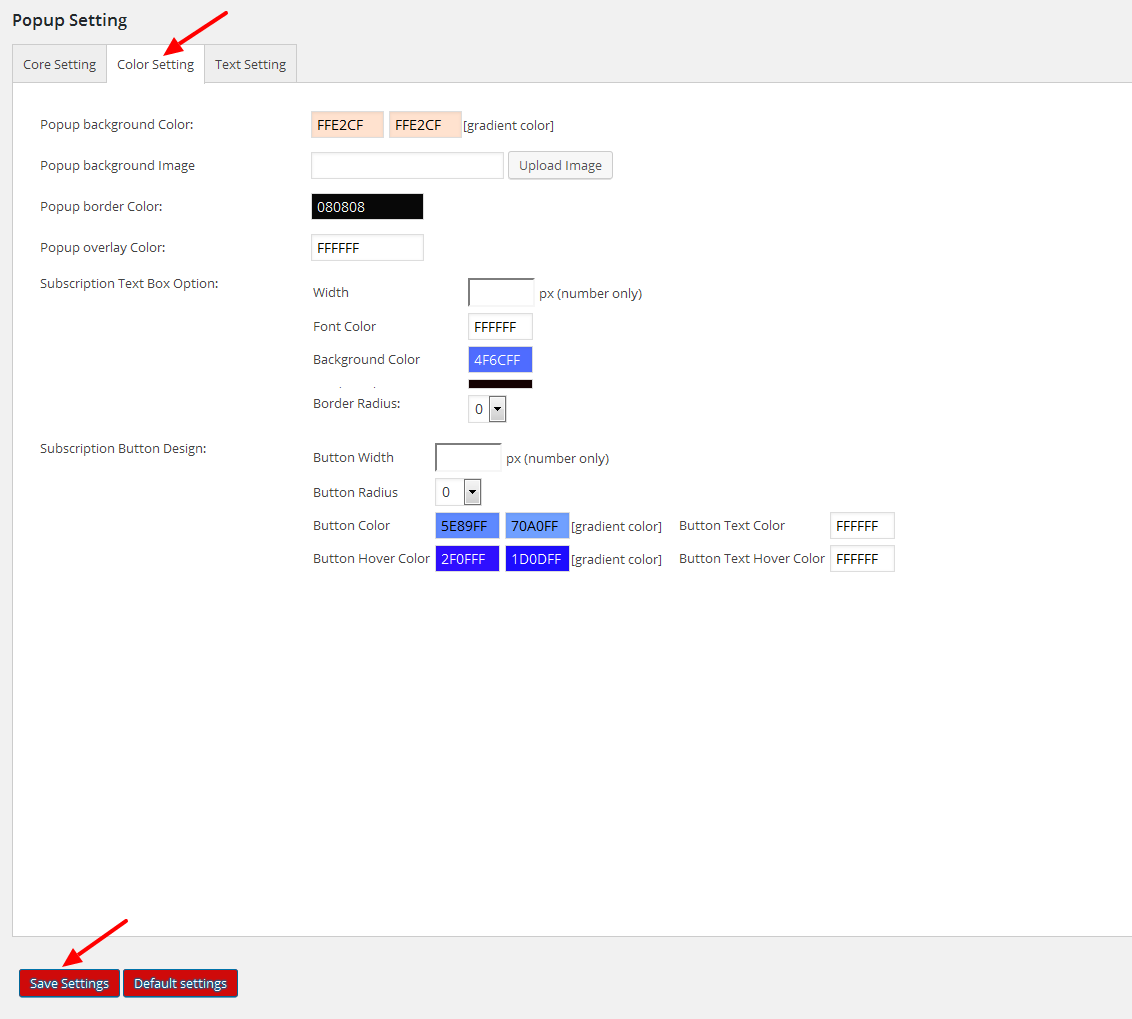
In color settings you can do below things:
- You can set popup background color(gradient).
- you can set a popup background image
- Popup Border color
- Popup overlay color
- You can design Subscription text box. set width, font color, background color etc..
- you can design Subscription button. button width, button color, hover color, text color etc…
Custom Popup Text Settings
In this section of the documentation, you will find information regarding the Custom Popup Text Settings menu.
Below is the Custom Popup Text Setting page
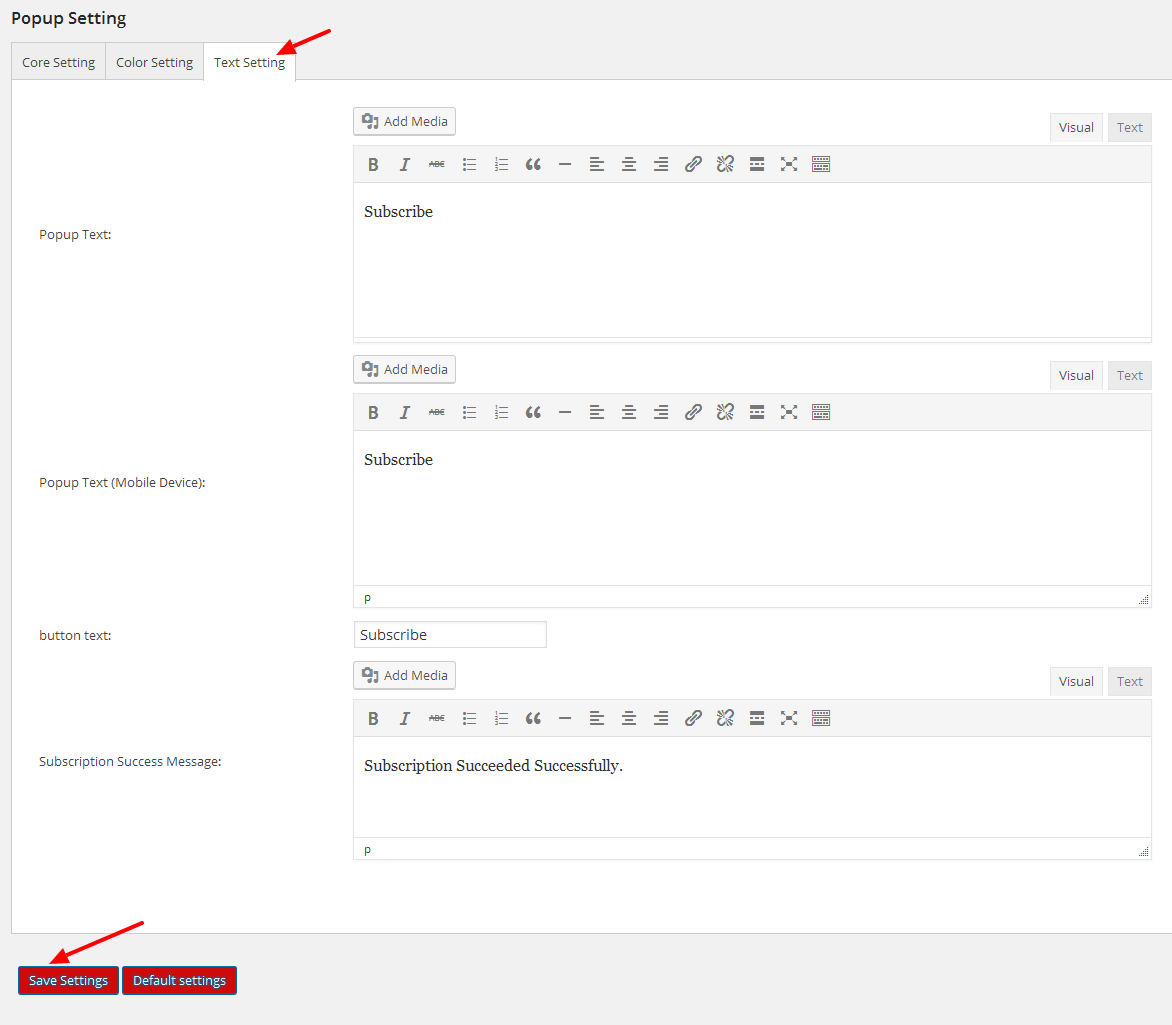
In color settings you can do below things:
- You can set popup Text.
- Popup Text for mobile device
- Button Text
- Subscription success message0
Custom Popup
In this section of the documentation, you will find information regarding the Custom Popup menu.
Below is the Custom Popup Page

Mailchimp Subscription Popup will be According to your custom popup setting/design from admin
Widget Settings
In this section of the documentation, you will find information regarding the Widget Settings menu.
Below is the Widget Settings Page
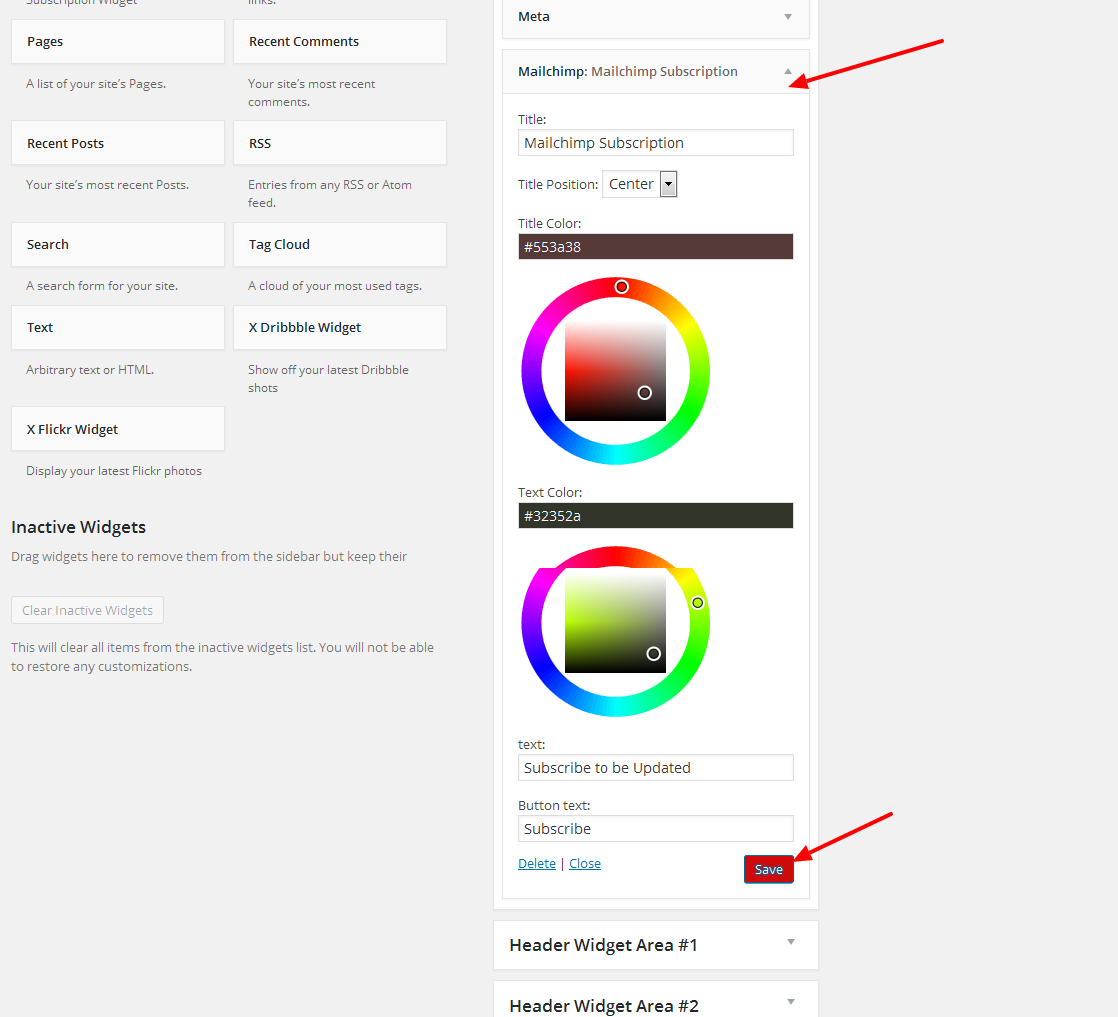
In Widget Settings page you can do below settings:
- Title of the widget
- title positon and title color
- Text color
- instruction text
- and Submit Button Text
Mailchimp Widget
In this section of the documentation, you will find information regarding the Mailchimp Subscription Widget menu.
Below is the Widget Page
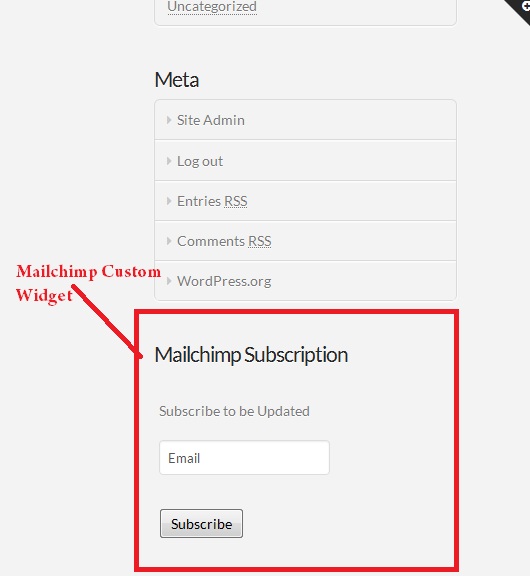
Mailchimp Subscription widget will be According to your custom widget setting/design from admin


